Bluesky Training
We will use:
-
The Binder notebook is at Binder Notebook with Jupyter Examples.
-
Virtual Machine from the previous training.
General information
This demo uses ophyd simulated devices, simulated devices based on SeCop framework (Sample Environment Communication Protocol) and SECoP to Ophyd abstraction provided by P. Wegmann (SECoP Integration for the Ophyd Abstraction Layer) and ADsimdetector in a container.
AreaDetector is EPICS support for multidimensional detectors. It’s an application for controlling area (2-D) detectors, including CCDs, pixel array detectors, and online imaging plates. (AreaDetector Github)
Prerequisites
Check if the containers are running:
docker ps -a
If not, try to follow the steps below. The first step is to check whether the simulated devices are running.
- Go to
${HOME}/.blueskydirectory - Do
git pullto fetch the latest changes - Use
docker-compose startordocker-compose up -d - Check if the containers are up and running
docker container ls
Start Bluesky
From a terminal write
bluesky_start
If it there is an error and bluesky does not start give the command again and it should work.
Check for connection
To check for connection use device.connected, for example for the simulated ADsim detector camera use my_sim_cam.connected.
Devices in the Beamline
The devices in the beamline have different components. To see the different component of a device use device.component_names. For instance, to see the component of the motor use motor1.component_names.
In general one can manipulate each component by referring to it as device.component.
Sample environment
Sample environment is based on SECoP and the interface is written using opyd-async, the two main nodes are gas_dosing and reactor_cell.
| Component | Positioner | Value |
|---|---|---|
| Temperature Regulator | reactor_cell.temperature_reg.target | 30.0 |
| reactor_cell.temperature_reg.value | 30.0 | |
| reactor_cell.temperature_reg.ramp | 500.0 | |
| reactor_cell.temperature_reg.status | (100, ‘at target’) | |
| Temperature Sensor | reactor_cell.temperature_sam.value | 29.999998 |
| reactor_cell.temperature_sam.status | (100, ‘’) | |
| Massflow Controller 1 | gas_dosing.massflow_contr1.target | 0.0 |
| gas_dosing.massflow_contr1.value | 0.0 | |
| gas_dosing.massflow_contr1.ramp | 150.0 | |
| gas_dosing.massflow_contr1.status | (100, ‘at target’) | |
| gas_dosing.massflow_contr1.gastype | He | |
| Massflow Controller 2 | gas_dosing.massflow_contr2.target | 60.0 |
| gas_dosing.massflow_contr2.value | 60.0 | |
| gas_dosing.massflow_contr2.ramp | 150.0 | |
| gas_dosing.massflow_contr2.status | (100, ‘at target’) | |
| gas_dosing.massflow_contr2.gastype | O2 | |
| Massflow Controller 3 | gas_dosing.massflow_contr3.target | 0.0 |
| gas_dosing.massflow_contr3.value | 0.0 | |
| gas_dosing.massflow_contr3.ramp | 150.0 | |
| gas_dosing.massflow_contr3.status | (100, ‘at target’) | |
| gas_dosing.massflow_contr3.gastype | CO | |
| Backpressure Controller 1 | gas_dosing.backpressure_contr1.target | 16.67 |
| gas_dosing.backpressure_contr1.value | 16.67 | |
| gas_dosing.backpressure_contr1.ramp | 500.0 | |
| gas_dosing.backpressure_contr1.status | (100, ‘at target’) |
Move motors and set values
Move motors
Read the position of the motor or detector:
motor1.read()
If you want to move a motor by running a plan, or a set of motors you can simply type:
RE(mv(motor1,position1))
or with magics
%mov motor1 position1 motor2 position2
or using relative motions
%movr motor1 relative_motion1 motor2 relative_motion2
Magics
%ctwill show a reading of all the detectors%wawill show all the motor positions.
Exported data
The data is exported in multiple files format.
Individual files
In the folder csv you find individual files for every scan, in particular:
- scanNumber_baseline.csv: here are contained the measured values for all the devices in the baseline (measured once before and once after the scan)
- scanNumber_meta.json: here are contained the metadata relative to the scan
- scanNumber_primary.csv: here are contained the data for the scan.
Scan Types
Several scan types are available by default in Bluesky. For a complete list and the documentation refer to the official documentation
Original syntax
Plans have to be passed as an argument to the Run Engine, and they are functions themselfs. For instance the count plan should be invoked like this: RE(count([noisy_det],5,delay=1))
Simplified syntax
Experimental ipython magics are available that aim to simplify the syntax. By prefixing the symbol % to the plan name, it is possible to use a spec-like syntax. For instance, the same count plan as above can be invoked like this: %count [noisy_det] 5 delay=1
In case of problems, please report it to the beamline scientist and use the original syntax.
count: take one or more readings from detectors. Usage (5 counts, 1 sec delay):%count [noisy_det] 5 delay=1
scanorascan: scan over one multi-motor trajectory. Usage (scan motor1 between -1 and 1 in 10 points)%ascan [noisy_det] motor1 -1 1 10
relative_scanordscan: scan over one multi-motor trajectory relative to current position. Usage (scan motor1 between -1 and 1 in 10 points)%dscan [noisy_det] motor1 -1 1 10
list_scan: scan over one or more variables in steps simultaneously (inner product). Usage (scan motor1 on a list of given points)%dscan [noisy_det] motor1 [point1, point2, ...]
grid_scan: Scan over a mesh; each motor is on an independent trajectory.RE(grid_scan[noisy_det], motor1, start1, stop1, num1, motor2, start2, stop2, num2)
Add metadata to the scans
Custom metadata can be entered by the user at the execution time of a plan. Suppose that we are exectuing a plan called scan() (for brevity we omit the parameters that we need to pass to the scan function). One can add the metadata either like this:
RE(scan(), operator='John', sample='pure_gold')
Another way is to add the metadata directly in the plan. In this case we need to use a python dictionary.
RE(scan([det], motor, 1, 5, 5, md={'operator':'John', 'sample':'gold'}))
or using the symplified syntax:
%scan [det] motor 1 5 5 md={'operator':'John','sample':'gold'}
Accessing the data by reference
Get the last element from the temporary database.
# Get the last element
run = db[-1]

#This has dimension 2 as we expect
run.primary.metadata['descriptors'][0]['data_keys']['test_image']['shape']
See the captured image:
import numpy as np

image = run.primary.read()["test_image"]

frame =image[0][0]
frame.plot.pcolormesh()
db_imarray = np.array(frame)
Abort Motion
Weather you are moving a motor or running a plan, the motion can be interrupted by pressing ctrl+c.
RunEngineInterrupted:
Your RunEngine is entering a paused state. These are your options for changing
the state of the RunEngine:

RE.resume()    Resume the plan.
RE.abort()     Perform cleanup, then kill plan. Mark exit_stats='aborted'.
RE.stop()      Perform cleanup, then kill plan. Mark exit_status='success'.
RE.halt()      Emergency Stop: Do not perform cleanup --- just stop.
To check the state of the Run engine you can:
RE.state
Example of a custom plan
Imagine you want to run your experiment which is going to involve changing temperatures, gas mixtures and reading from a detector. An example of the graph could be:
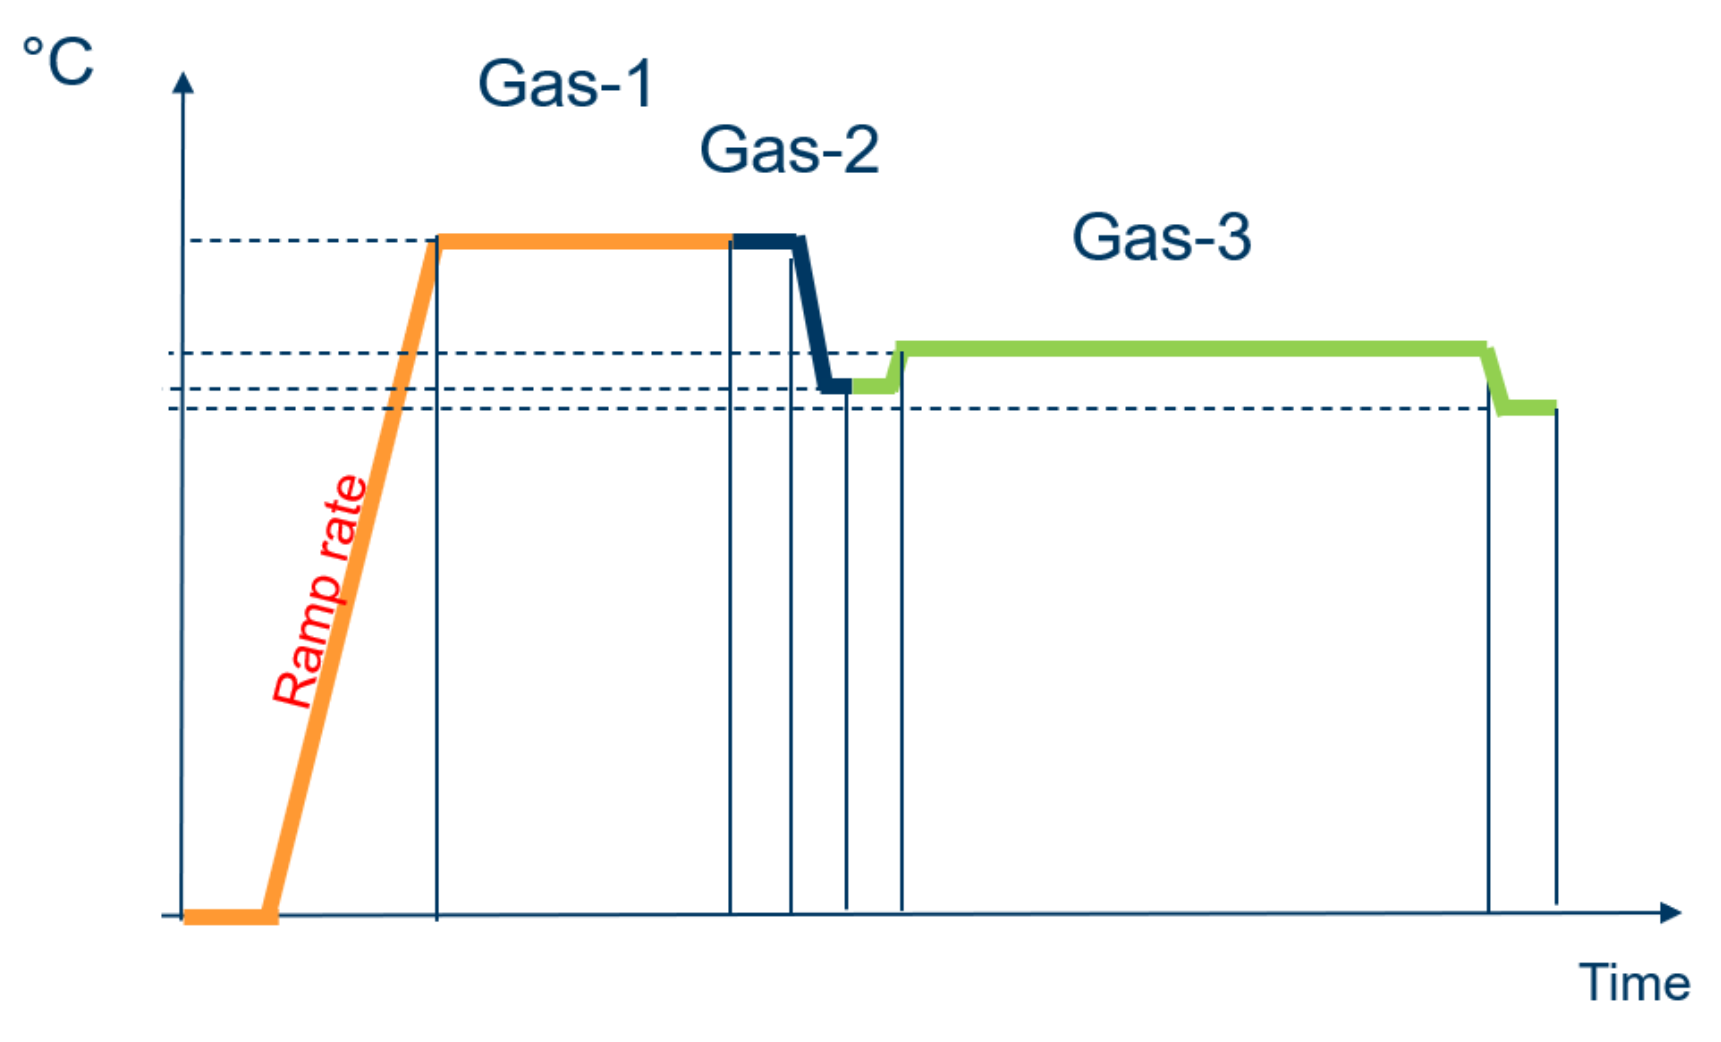
Let’s take a look at the overnight_example.py which is in the user_scripts folder:
%edit overnight_example.py
%load overnight_example.py
How to run the plan:
RE(my_exp())
How to write a script
Make a folder with your name in /home/bluesky/.bluesky/user_scripts/your_name.
The commands that are normally written in the ipython terminal should be passed as an argument to the function run_plan(), as in the examples below.
One can write either procedural scripts, where each line will be executed one after the other one like in the example below. To run this script just type load('example_script.py')
# create only one image per file
print(f"Current number of the adsimdetector images to be taken {my_sim_cam.cam.num_images.get()}")

print(f"If the number is larger than one set it back to 1")
my_sim_cam.cam.num_images = 1

# run a scan
run_plan("%scan [my_sim_cam] motor -1 1 10")
Or it is possible to define functions to call from the command line. To run this script just type load('example_with_functions.py'). Now the function test_plan() is available in the ipython session, so just type test_plan() to execute it
def test_plan():
    # create only one image per file
    print(f"Current number of the adsimdetector images to be taken {my_sim_cam.cam.num_images.get()}")

    print(f"If the number is larger than one set it back to 1")
    my_sim_cam.cam.num_images = 1

    # run a scan
    run_plan("%dscan [noisy_det] motor -1 1 10")
Experts Section
If you are a user, this section is not for you.
Additional command to start bluesky
Bluesky is running in containers. To restart the containers use:
bluesky_start restart
To bring down the containers:
bluesky_start down
To enter the container to debug:
bluesky_start sh
VM - known issues with dockeroperational
One of the reasons for the container failing to build might be a broken simlink.
Check for the active containers:
docker -ps --external
If there are any processes related to the containers that are running use:
docker rm <process-id>
If the simlink failed, remove the directory listed in the error message and try to remove the process again:
docker rm --force <process-id>